#tumblr gif file size limit be the cause
Explore tagged Tumblr posts
Visit Tumblr Blog
Explore Tumblr blogs with no restrictions, modern design and the best experience.
Last Seen Tumblr Blogs


Fun Fact
Tumblr has 4 main sources of revenue.
Text

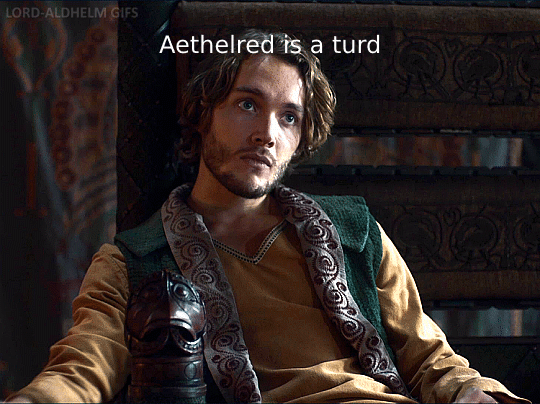
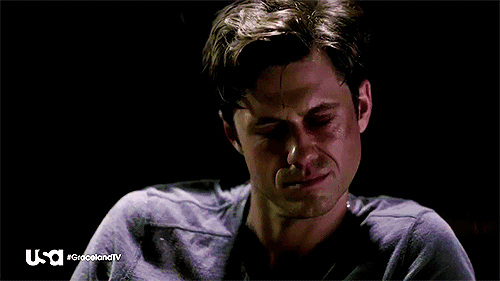
|| Pirate!Aventurine || Tide & Seek || Honkai Star Rail ||
#sorry for the ass gif quality#the original is way smoother and cleaner#tumblr gif file size limit be the cause#I swear it’s so annoying#there’s also another moment where he flips the coin but compressing that file is impossible#honkai star rail#hsr#aventurine honkai star rail#aventurine#honkai star rail gifs#aventurine hsr#pirate aventurine#pirates#pirate au#tumblr gifs#skipps shares#skipps gifs
71 notes
·
View notes
Text


I’ve been playing Just Cause 2 again
#the gif is low quality because of tumblr's file size limit#but I think it looks cool anyway#rico rodriguez#just cause 2#tw blood#just cause 3
4 notes
·
View notes
Text
Making Gifs Part 2: Photopea
This is part 2 of my own personal gifmaking guide. Please read Part 1 to learn about how I capture the sequential screencaps to make my gifs.
Once you have your screencaps, open Photopea. They have a very simple guide on how to make animations in their help guide. I will be going into much more detail.
Note: ***Tumblr has a limit of 10mb for the filesize of each gif, and recommends no wider than 540 pixels. If your gif is wider than 540 pixels Tumblr will resize it, and it will cause the quality to be reduced, and also take much longer for the gif to load in your post.***
1. RENAME CAPS:
First things first. Rename all of your caps that you will be using for a gif to have the prefix _a_ on your computer. Select all and right-click on the FIRST file and select Rename (windows) and type _a_. Windows will add the numbers.
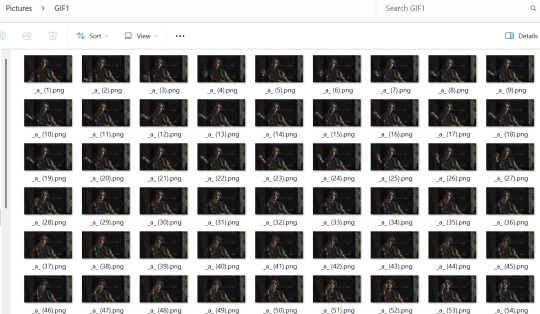
For most gifs, try not to have more than 60 frames as it will make the gif too large to upload to Tumblr. I usually aim for 45-50 frames max for most of my gifs.
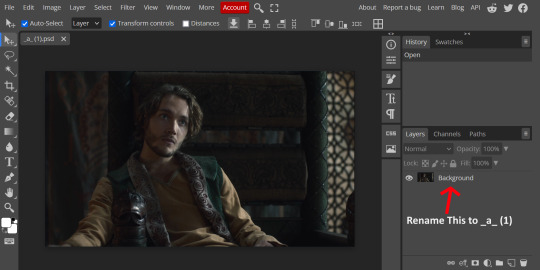
2. IMPORT FRAME #1:
Drag and Drop _a_ (1).png into Photopea. Rename the layer from Background to _a_ (1)
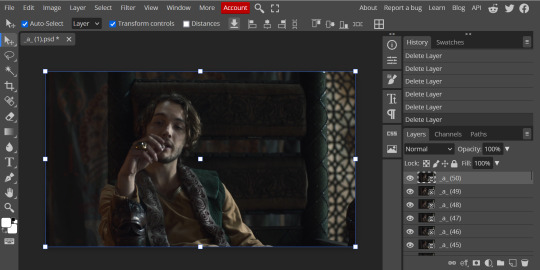
3. IMPORT IMAGES:
Select all the rest of your images from the folder on your computer, and drag and drop ON TOP OF the image (not the layers section). Make sure the file you grab to drag/drop is the next one in the sequence (so _a_ (2).png in this case. Otherwise they will be out of order. If you do it right, you will see the layers section on the right get populated with your caps in reverse order, with 1 at the bottom and the last one at the top.
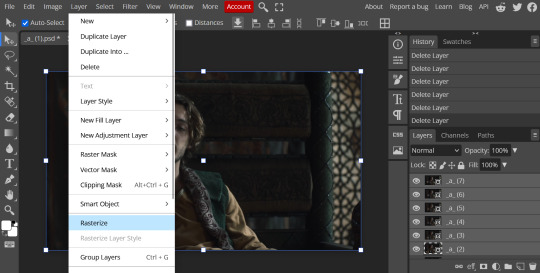
4. RASTERIZE:
Next, select all of the layers (on the right, by holding CTRL and clicking on each layer), go to Layer > Rasterize. They are currently Smart Layers, and if you keep them this way the sharpening will not apply (for some reason, I have no idea why that is)
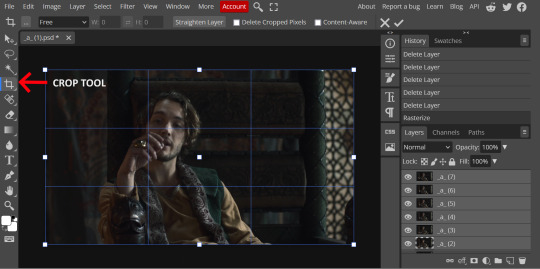
5. CROP:
Next, crop your gif. This tool is on the left menu. You do not have to have all the layers selected for this, it will crop all layers together. Move the blue lines at the edges until the frame is cropped how you like. Be mindful of the character moving in other frames; you may want to check your other layers to make sure nothing important gets cropped off in another frame. Once the blue lines are where you want them, click the checkmark at the top right to finish the crop.
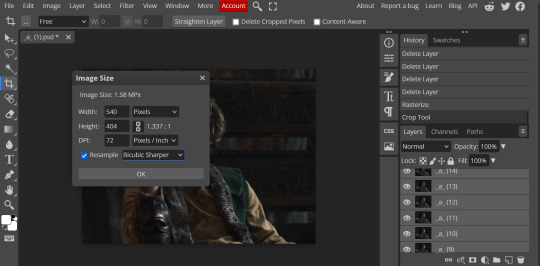
6. RESIZE:
Resize your gif so that it is 540 pixels wide. Go to Image > Image Size in the top menu. Make sure you choose "Bicubic Sharper" as the resample mode. Once this is done, you will see your image is tiny, so go to the Zoom tool (on the left menu, the magnifying glass near the bottom) and select Fit the Area at the top of the screen so you can see what you are doing.
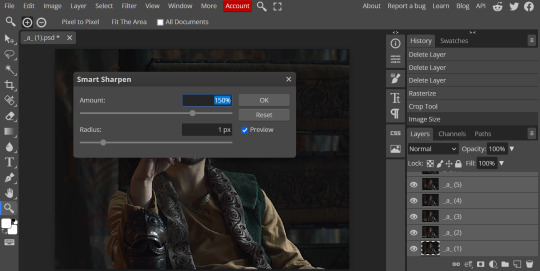
7. SHARPEN:
Next is sharpen. Select all your layers again (on the right), then go to the top menu: Filter > Sharpen > Smart Sharpen. The default settings here are for 150%, and that is good for most things.
8. ADJUSTMENTS
This is the tricky part. You now need to adjust the brightness, contrast, exposure, color balance, and saturation. This will vary from gif to gif how much to adjust these values. I will show how I adjusted this one and you can apply that to whatever gif you are making.
For starters, since this show is SO DARK, you will need to brighten it. There are many ways to do this, but I found the method that works best for me is adjusting the Levels.
First off, in order to make adjustments, make sure you scroll all the way to the top of your Layers panel and make sure only the TOP LAYER is selected. Otherwise the adjustments will only be applied to whatever is BELOW the selected layer. You want all of them.
8a. ADJUST LEVELS
Next, go to Layer > New Adjustment Layer to pull up all your adjustments. For this first example we will use Levels, which is the second from the top.

You will see a histogram like this one:
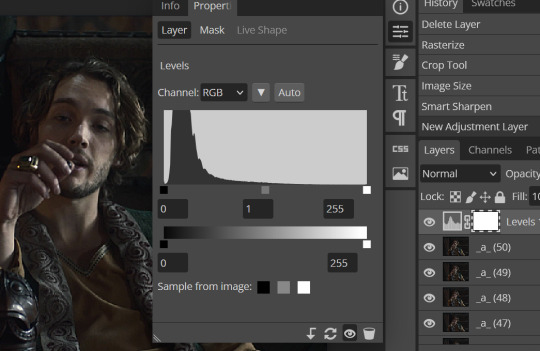
This is a lot of information about the image, but pay attention to where the curve starts and stops. On the left, you see a "0". That is your dark point. This image is slightly washed out so I need to move that adjustment to the right so that the little square is just below where the curve starts. The third number is "255" and this is your bright point. The images are very dark so most of the graph is shifted to the left (dark) so in order to brighten, move the third square (the white one) so that the second square (grey one) is just at the edge of where the curve drops off on the right.
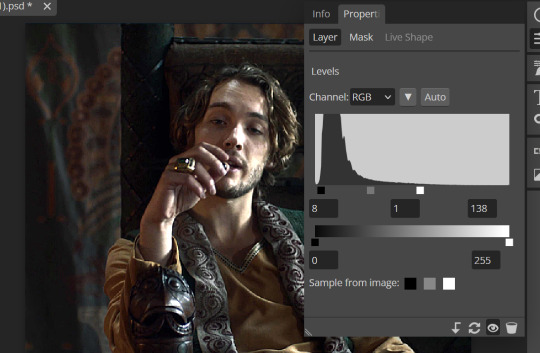
You can now see the numbers changed. Moving the first dark square will enhance your contrast, and moving the THIRD square will enhance your brightness. It is usually not necessary to move the second square, but you can experiment with this by moving things around and seeing how it affects your image. After this, it may be necessary to also increase the Exposure and Brightness if it is still not bright enough, but most of that can be done here.
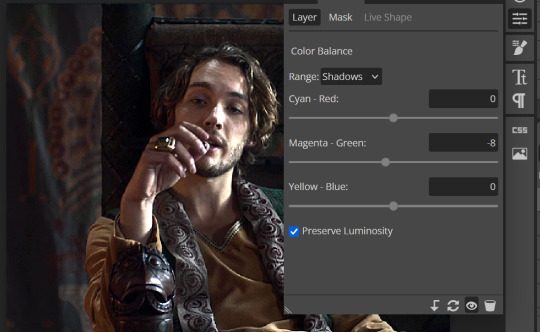
8b. ADJUST COLOR BALANCE
Again go to your Layer > New Adjustment Layer > Color Balance to get this tool. This is a neat one with A LOT of variables, so play around with it to get the colors to look how you want. A lot of the raw video tends to have a bluish or greenish cast to it, so you just move the sliders to get rid of the cast and make the colors look how they are SUPPOSED to.
In this case there is a very slight greenish cast to the pictures so I will adjust that slider to compensate. The Range (at the top) you can select Shadows, Midtones, or Highlights, depending on where the color cast is located. Usually I stick to Shadows but sometimes will use Midtones if the color cast is really bad. Make sure Preserve Luminosity is checked.
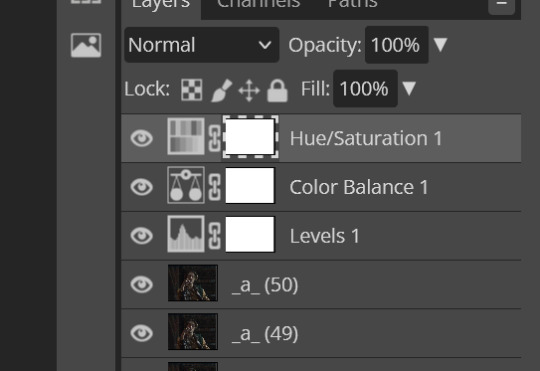
8c: ADJUST SATURATION
Layer > New Adjustment Layer > Hue/Saturation. This will brighten up your colors. This tool is VERY COOL in that you can select color families to selectively increase or decrease the saturation of. Under Range you can choose Master, which is all colors, or choose only Red, Yellow, Green, Cyan, Blue or Magenta. The slider at the very bottom (when a single color is selected) allows you to set the range of colors to. I chose Master and increased the saturation of all colors, but be careful as this can make skintones look VERY orange. So select other colors in the Range to adjust single colors only.
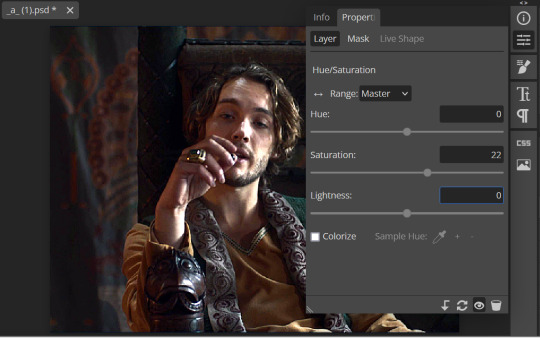
With this tool you can also change the HUE (which is changing the overall colors to a different color, like shifting all the reds to orange) and Lightness (which may or may not be necessary if you did the Levels correctly)
If you need to go back and change something in your adjustment layers, you can do so by clicking on the white box in the Layers section next to whatever you need to adjust.
There are many other Adjustment Layers you can play with, so have fun and experiment!
9. ADD YOUR WATERMARK AND TEXT
Next, you can add a watermark if you have a premade file, by dragging and dropping it on the image. Then move it around to where you want it, resize it if needed, and change the opacity if it is too bright. Make sure this layer is the TOP layer.
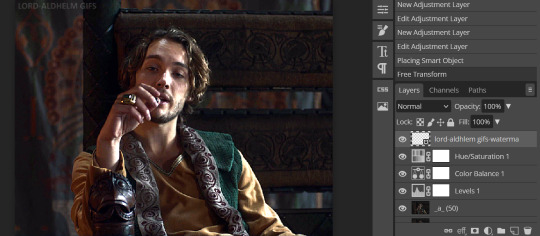
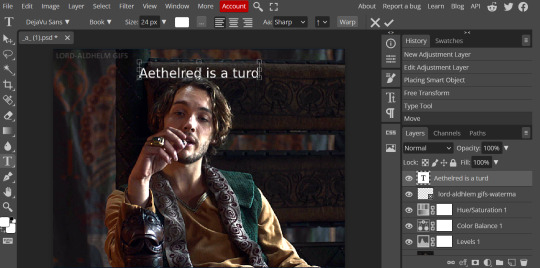
To add text (for subtitles or effects) simply click on the Text icon in the left menu (the T) and click anywhere on the image and start typing. You can change the font, color, size, and style in the menu on the top. Move the text around by using the Select tool (arrow on the left) Again make sure this is the TOP LAYER so that it will be present over the entire gif.
10: EXPORT YOUR GIF
File > Export as > GIF
A pop up dialog will appear and you can change some settings here if you want. I usually don't. Pay close attention to the filesize (at the bottom) and make sure it is under 10mb. Keep the quality at 100%. And most importantly MAKE SURE DITHER is checked! This will prevent compression artifacts from ruining your gif.
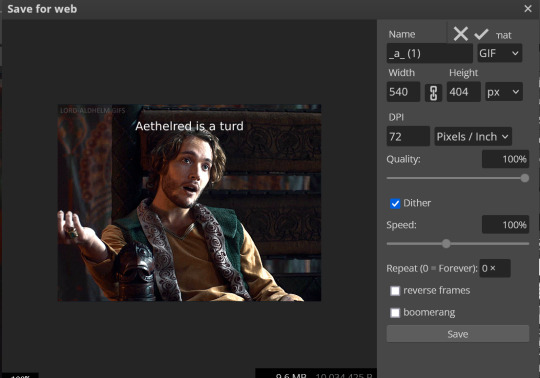
Save the file to your computer and VIOLA! Gif!
Have fun!
#gifmaking#gifs#gif makers#gif making resource#gifmakers#gif making#gif#gifmaking resources#gif making resources#my guides#giffing tutorial#gif making tutorial#photopea#photopea tutorial#photopea resources#photopeablr#photopea gifs#long post
44 notes
·
View notes
Text
How to make GIF's from videos

I consider myself relatively knowledgeable on GIF making, but I am not an expert. This tutorial mainly focuses on making GIF's and sharpening, for a PSD tutorial see here.
A few things to note before starting:
I struggle with sharpening GIF's- Especially real-life GIF's. For some reason I can't quite wrap my head around when/if the GIF's look too sharpened, so the tutorial part on this may seem lackluster.
I only use photopea and ezgif for GIF editing and capcut for cutting videos. I won't be able to answer questions about other software's (ie photoshop).
Tumblr has a GIF size limit of 10MB. It's the bane of my life. Always check how big your GIF is.
And with no other questions let's begin.
How to make a GIF from a video
Find the video and download it (real life)
This is a very obvious step but one that is important. I would always recommend finding videos in good quality. I often use tiktok, free videos from sites (like pixabay) and Instagram.
As for downloading them, I would recommend avoiding '[website] downloader' sites for a few reasons. A) they get shut down and replaced with spam sites frequently, thus making them unsafe to use, and B) they often times make you watch an add or remove ad blocker before giving you the highest quality download option.
I would always use cobalt.tools for video downloading.
Find the video and download it (anime)
This is more complex and I won't detail my download methods publicly. All I can say is not to use the anime watch sites to download your videos from, they're often low quality and have watermarks- Plus a lot of the sites have pop-ups ect which make them unsafe.
If you want a video tutorial I can't link you one from YouTube. This is not a YouTube tutorial. Nope.
Anyway, once you have it you will need to use capcut to shorten the video length (and potentially change the file) however you will need to make an account. Annoying I am aware, but it's the best video cutting software I know of and has caused 0 issues for me.
Not that when I first used captut the video save settings had the video at 720 pixels, however you want 1080 pixels because it makes everything smoother and higher quality. Once you change this setting you don't have to change it again.
Make the GIF
I always use Ezgif for this part. You need to use the video to GIF option and upload your video. Then choose the length of the video you want to turn into a GIF.
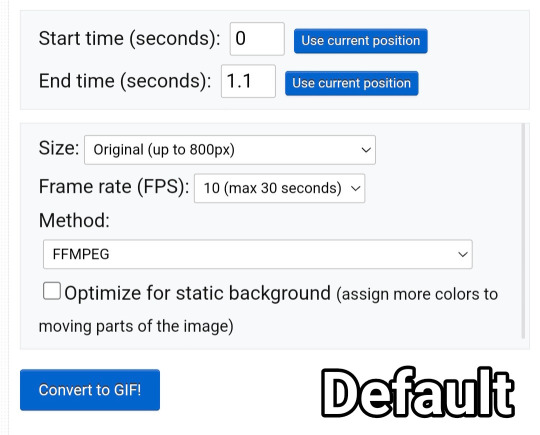
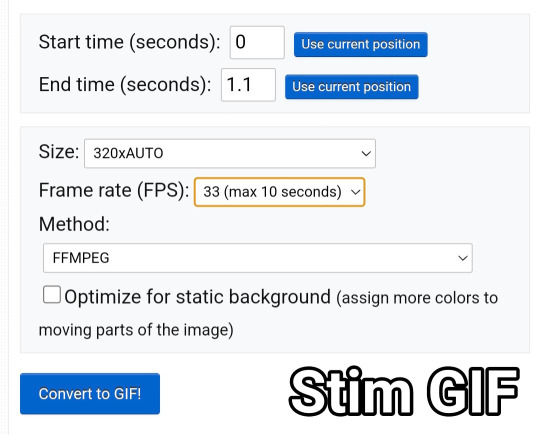
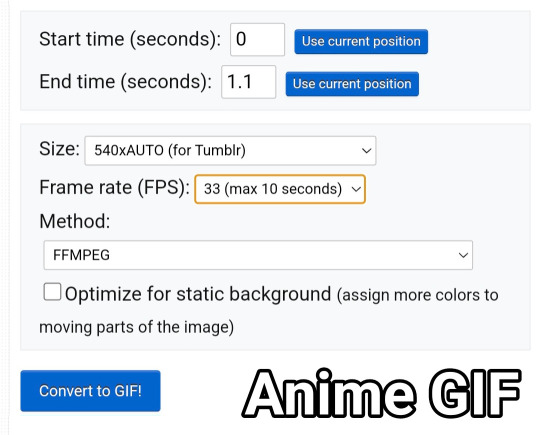
You will be met with a screen like this under the video.
Frankly I do not know what all of this means so that's why I only edit the size and frame rate.
With the size, you don't want it too big, smaller gives you more wiggle room for size with tumblrs size limit. However, with anime videos there's often less colors/detail, so they can be bigger and still look good.
The frame rate is important, the higher the frame rate the better quality it is, so regardless of GIF always have it this size
Then you hit convert to GIF and there you go.
If you need to crop the GIF use the crop tool and if there's any points of the video you don't want (ie frames of the next scene) you can use the frames tool (note that imo it's easier to use the photopea timeline for this)
Editing the GIF
You can just leave the GIF as it is, or you can make it sharper and/or add a PSD in photopea.
For stim gifs I will simply direct you to this tutorial because I can't understand the irl GIF sharpening process without photoshop's tools.
However, for anime ones you can use the smart sharpen tool, I either leave it on the default setting, or turn down the radius to 0.1-0.5
You can find the sharpening tool in filters > sharpen > smart sharpen
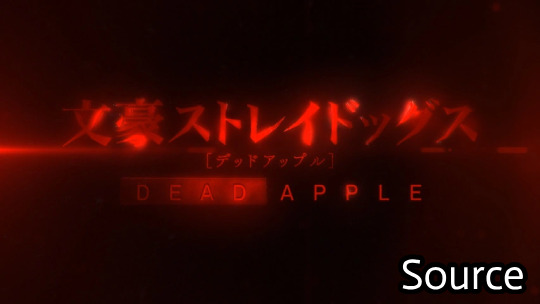
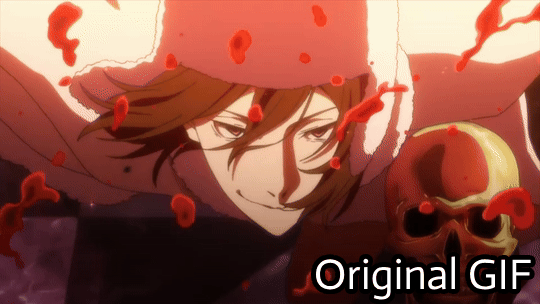
And here are some comparisons.


I spoke about PSD's here, but here's an example of the GIF with one and sharpened.

5 notes
·
View notes
Note
Hi! Gotta say ur work is super cool! If you don’t mind me asking, I was wondering what program(s) you use and what your workflow is like?
hi hi, why thankyou:) i should do a good post about this cause i get asked now and then
so
I take my nikon d7100 with me wherever I go and usually a couple older film cameras too, so i accumulate alot of photos & videos. portraits, nature stuff (especially bugs), and random stuff

if i wanna glitch it, i generally use photoshop to change the format to something spicy and mosh it with HxD. That program works for video files too. Just replace random chunks of the code or paste in gibberish nothing fancy haha.

for fancy compositing/vfx/animation stuff i use after effects. i like to mess with the colors quite alot. when the mood hits , coffee + audiobooks , dump my recent DSLR or phone footage into AE and play with it, and make little snippets (usually just 1 second long). These are exported as quicktime MOV files into a big folder. luckily i got a custom batch conversion script made by a genius that uses ImageMagick + gifsicle + ffmpeg to process the MOVs into tumblr-sized GIFs . Before I had that, i used to convert them all manually with tons of tweaking to preserve as much quality as possible within tumblr's filesize limitation.

for VHS stuff its alot more annoying. finding a VHS camera in 2014 was the main reason i started posting stuff online haha. i got a General Electric 9-9806 and some others. the ancient proprietary batteries are impossible ($$$) to replace so it's a huge hassle to shoot VHS or even VHS-C out in the wild. for ease and improved control, i shoot digitally and convert to VHS with a magical system. i made a diagram today so u can see

[this involves breathing in alot of dust under my desk as i plug and unplug tangled cables and drop things and spill stuff and fight spiders]
hopefully that makes sense haha, so u can turn any digital video into VHS and then digitize it. everything's quite cheap besides the computer.

it's alot of fun to combine all this stuff, adding VFX and glitches to nice footage and running it through a VCR. but also , sometimes plain video/photo is also nice . i try not to smack too much crap on for the sake of it; ultimately the camerawork should speak for itself [though i am def guilty of making lots of lazy images haha cause i feel pressured to post here as much as possible. hopefully when i'm trying my best u guys can tell haha]
hopefully that answers what u wanted to know :) though maybe u meant 3D which is another topic eheh. this is where most of my energy is going nowadays

46 notes
·
View notes
Note
I've been wanting to this but I've been too shy for too long hahahaha
I've been making verivery content for a while but I really want to improve my gif sets, and your gifs are mighty beautiful TT_TT may I ask for advice? Like do you use your laptop or your phone? Do you use photoshop??
oh feel free to ask me anything ! :D and yes of course ! gifmaking is actually fairly complex on tumblr ;-; so i'll try my best to include the basics and all the important stuff !
for gifmaking i use photoshop 2018 and so i use a laptop >.< i’ve seen a lot of asks where people ask about what apps gifmakers use... and to put it nicely ... there is no easy way to get nice gifs T-T the reason gifmakers on tumblr have such nice gifs, is bc there’s a lot of patience, learning, and practice involved in creating gifs for this platform... you can’t just plug in a video clip to a gif converter and expect it to spit out an hd gif for you ... unfortunately ...
before beginning i’ll recommend this tutorial ! it’s the tutorial i used when i was first learning... and my best advice is to have lots of patience ;;;; tumblr is a hard platform to make gifs for and learning how to make nice gifs will not happen overnight
Photoshop and other resources
i personally downloaded ps 2018 and that works fine for me but i’ve noticed that ps cs5 or earlier tends to have a broken ‘import frames to layers’ action so i’d suggest newer versions for gifmaking ! to download i basically looked up youtube videos and checked comments to make sure the tutorials actually worked,,, but if you want you can try these posts ! (1, 2) i’m not sure if they work but usually there’s a lot of posts made on tumblr + other sites for downloading it for free !
About video processing programs
i also use avisynth to process my frames... this might be a really complex bit to learn and it’s not 100% necessary so i’d say you can skip over it when you’re first learning photoshop and everything but if you are interested ! basically programs like avisynth and vapoursynth reduce the video file size down to tumblr’s preferred image size without reducing the quality as much as resizing in photoshop does :o ! additionally it helps process torrents (these are the ts and tp files for live performance stages that are super hd !) but again it’s somewhat complicated i’d recommend this tutorial for download and use if you ever want to ! (vapoursynth additionally has sharpening and denoising options, but since i’ve never used vs it’d be easier to look up a vs tutorial than to ask me >.<)
Where to get videos
this part is CRITICAL !! for gifmaking,,, you could be the best gifmaker on this whole site but if you have a video with poor quality... no matter what,,, your gifs will not come out nicely T-T so when downloading any vlives or youtube videos, they should be at least 1080p in quality ! or as high quality as possible ! this is bc you need to reduce the file size down by a lot for tumblr’s dimensions and this means you need the best quality :o ! i typically just screenrecord videos these days bc downloading whole hour long vlives / long youtube videos is a strain on my laptop hhh ;;; for live perfo stages you should always download torrents to use but this means you need video processing programs like i said above >.< there’s a resource here to help find them !
these are the basic tools you’ll need hhhh there’s a lot more including sizing, sharpening, coloring, frame rate delay, exporting, saving, etc... and i don’t want to make this too long but !
essentially tumblr has size dimension restrictions for image files, a pixel too big or too small will cause tumblr to stretch or compress your gifs making them blurry... the dimensions are optimally: a.) 540pixels (width) for one gif in a row b.) 268pixels (width) for two gifs in a row c.) 177pixels / 178pixels / 177pixels for three gifs in a row
for sharpening many people use topaz etc. and i’ll point you to other tutorials if you want to use it but tbh ! i use photoshop’s smart sharpen options and those work just fine for me... (plus topaz takes forever to render and i h8 its guts so)
coloring - okay so this is probably THE MOST time consuming part for gifs for me.... idk if you’ve noticed but lots of times, gifmakers’ gifs have pretty colors and nice lighting when you compare to the original video ! that’s bc we add layer adjustments in photoshop to make them look nice ! these include brightness, saturation, exposure, vibrancy, etc. but knowing how to use adjustments is a whole post on its own >.< there’s lots of coloring tutorials out there as well if you want me to direct you to them !
for frame rate delay, i use 0.05 seconds for 30fps (so your normal videos) and 0.03 for 60fps (if none of that made sense that’s okie ! it’s just basically how fast you set frames to play in your gif !)
when exporting - tumblr has a 10mb gif limit but honestly anything above 8mb starts making me anxious or takes too long to load .... so most my gifs are like ... 3-7mb only
but yea these are just some basic tips and stuff ?? i’m sorry it took me so long to respond and it wasn’t as nicely organized as it could be... there are a lot of really good gif tutorials out there ! you just have to look a little ! if you have any additional questions tho feel free to let me know ! i just didn’t have the heart to type out the literal process i have to go through everyday when making just one gif :p i’m sure a lot of gifmakers can relate haha,,,, happy gifmaking !~
#one day when i'm about to d*e i will release a comprehensive gif tutorial#but for now .... even i am astounded still on how much work making content is sigh#me and my cc moots should be getting paid .... ngl T_T#bonknanab#asks#🌱.text#resources#the way this doesn't even go over sharpening all that well sigh ....#there's just so much#and sorry if this sounds?? like salty in any way LMAO#idk how many times i've seen asks where people are like ??? what app do you use on your phone#and bro .... there is no app it is all my blood sweat tears and avisynth#like the frustration i feel#when people repost and are like ? what's up it's just a video anyone could make gifs#and i'm like ??? then make your own and stop reposting mine ???#sigh#anyway i hope this was helpful ;;;;#i've been gifmaking for a while and even now i'm like ... but do my gifs actually look ok#or am i making it up in my head and they're ugly ;((#fjhdgkfjghdkf#do people even want to hear gif things from me LOL
18 notes
·
View notes
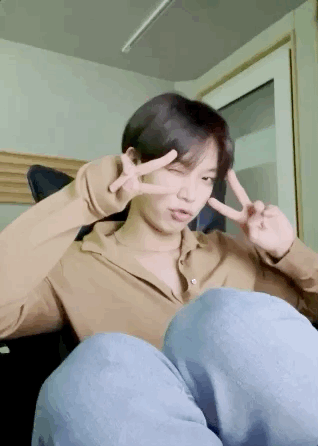
Photo


I only looked at her. So how come she never looked at me?
#exo#baekhyun#una canción de amor#☆彡#바래다줄게#take you home#take you home mv#sm station#edits#q; listening to baekhyun sing every song that aventura has ever produced#alright so i know this looks super ugly#i'm sorry but tumblr's file size limit for gifs is shit#it looked hella prettier in ps before i had to undo some shit#cause it was too big like i just#:))))))))
8 notes
·
View notes
Text
Lightning Mailbag: Mailing it in
Short questions with quick answers, let’s go.

Now that the PS5/Xbox Series X are now out, what are your thoughts, as a developer and a player, on the consoles?
As with any new generation of hardware, I can’t wait to see what developers will do with them once they don’t have to support the previous generation.

Do game jams actually teach anything for veterans of the industry? I know it is great for beginners.
We’re all beginners at something. Game Jams are great for veterans in one field to try their hand at something new - designers coding, artists designing, etc. It’s an excellent opportunity to try something either a little or a lot outside of your wheelhouse and still leverage your experience in other fields.
Hi Gamedev! I have a question about Itch assets: Do you think they are a good idea for small devs that are just starting to work in new projects? Do you have any recommendations when buying assets? Thanks!
I think buying (or using free) premade assets is great way to get something started and a not-so-good way to get something shipped. Video games are highly visual in nature; having a specific art style is critical to building a game’s identity with its audience. However, it’s super important early on in the project to “find the fun” by establishing core gameplay. That can be done with placeholder assets while the team is still figuring out the art style. I think of premade assets (especially visuals) like a temporary stopgap to get things functioning, but not as useful long term to ship a product with.
Is it true that you are more likely to get hired if you have lots of followers on twitter or instagram?
Only if you’re applying to be an influencer or community manager.

Did something change with texture/audio quality or compression in the last few years that caused the size of games to balloon so massively? The Avengers game takes over 90GB. Call of Duty has memes for wanting 250GBs. Forza 7 is nearly a 100GB download. Borderlands 3 weighs in at nearly 120GB. It's becoming painful for laptop gamers with SSD size limitations.
The tradeoff is typically size on disk in exchange for performance. Instead of having to spend time reading file data from multiple parts on disk (which is slow), we can have redundant/duplicate assets that are closer together for load times. For some background reading, [click here for a post I wrote on redundant files in Spider-Man PS4] and [click here for an old post I wrote about game file sizes].
Some games which are ported to PC or get a higher frame-rate option for enhanced consoles will still have cinematics that run at 30fps even while the game can run at 60. Why is that?
The cinematics were probably originally animated at 30 fps and the art team didn’t want them to play at double speed.

I know game piracy is a popular thing and has been for decades in a vast swath of the non western world. Do you think that if the financial situations of these countries improves that piracy would drop or that resistance to change will keep it alive to the extent it is right now in places like India and Brazil?
The popularity of piracy does have a major effect on the kind of games available in those regions. Most games in those regions now require an account and an authenticated back end. You can’t pirate a game that requires a login and a server connection because it’s way harder to pirate and operate a game server.
[Join us on Discord] and/or [Support us on Patreon]
The FANTa Project is being rebooted. [What is the FANTa project?]
Got a burning question you want answered?
Short questions: Ask a Game Dev on Twitter
Long questions: Ask a Game Dev on Tumblr
Frequent Questions: The FAQ
23 notes
·
View notes
Note
omg I need a full tutorial on how you do your edits on powerpoint because sis my edits trying to have even a little hint of *amazingness*
Hi! First of all your edits are beautiful and I am queuing them up 💛 and again, I'll never be as adept as the Photoshop gods, but since both you and @achalk asked, Powerpoint is surprisingly easy to use after some practice and is adequate to make edits, especially if you’re a beginner like me. I’m also still learning about color and fonts and other aesthetics.
A lot of it is trial and error, which is why I never look at my older edits cause they were definitely more on the error side, but I can break down some of my newer edits so you know what went on in there.
What usually takes a long time in edit making (especially graphics) is finding the right movie frames/pictures. The pictures I use are frames from movie files that are larger than 3gb. A truly marvellous place to find those files are in this post by @in-a-cave-with
Figuring out how to arrange things is a balance between what picture you want to make and what the edit is about. for my last edit all the circular shapes was supposed to be like the arc reactor’s circle but that point might have been missed.
Anyway, I have no idea about your skills but under the cut we start with the very rudimentary basics and then I’ll dissect some of my edits for you. please excuse the messiness of my Powerpoints windows
The Basics
First of all, it depends on what version of Powerpoint you have. My university gives us free access to the Office 365, so that’s the version I’m working with.
I’m pretty sure a lot of the features I use most often (shapes, arranging, and animations) are available on all versions, though.
The gridlines are really helpful with positioning, and you can use the space beside the slides to add notes.
Also, to change the slide size, go to the Design -> Slide Size -> Custom Slide Size.
Usually, I use a width of 33.867 cm, which is the default for my Powerpoints and that translates nicely to 1280 pixels when you save as a PNG file.
The 1280 pixels is a multiple of 540 pixels, which is the width that tumblr rescales your images to, so it balances the quality of the image with tumblr’s determination to ruin that quality.
What I usually modify is the height of the slide, and that’s a balancing act. You want enough space to fit what you want, but not too much to crowd the dash. Nobody knows anymore what the maximum height limit is for tumblr but I try to keep the height below 60 cm for proportionality.
Note: each Powerpoint file can only have one slide size. So if you want to make one graphic but using two different slide sizes, you need two Powerpoint files.
Usually, I stick to one slide size per graphic so that it doesn’t confuse people.
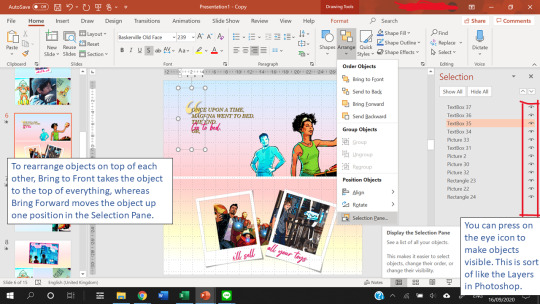
Finally, Arranging things is really useful. This allows you to have multiple “Layers” in your slide.
Creating Templates
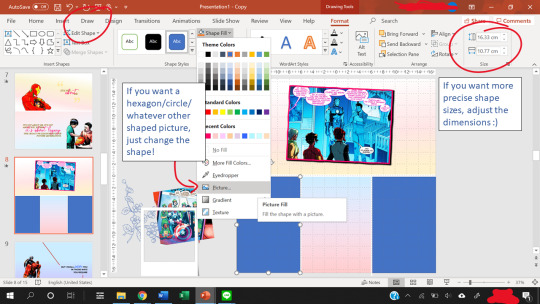
Shapes in powerpoint are a beautiful thing. And the most useful thing is that you can fill a shape with a picture or with a gradient.
After you fill a shape with a picture, you can go to Format -> Crop. Then, you can resize that picture.
If you have the Draw tab in your Powerpoint, that’s also great for you to draw your own lines and shapes to give things a more authentic feel. You can find the Draw tab here if you have the right version of Powerpoint.
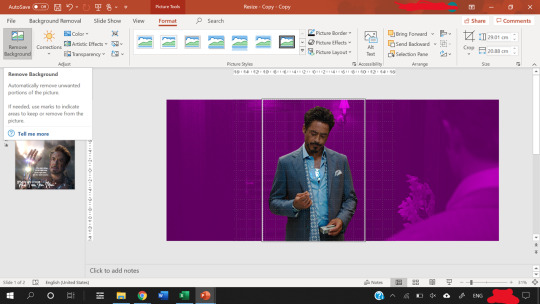
The Corrections option (see picture below, it’s the one with the sun icon) under the Format tab is great for quick adjustments to the brightness and contrast of a picture, and for saturation or grayscale adjustments you go to Color right next to it.
Artistic effects are useful to blur a picture, and if you want to adjust even further, you can go to Options at the very bottom of the pop-up which brings up a side panel for you to fine tune everything.
Notice that on the left of Corrections there is Remove Background. This is very useful as long as your picture has a clear background and foreground.

Shapes can also create a “template” for when you have more than ten images (which is the tumblr limit). You can put two images into one slide easily using the shape as a template so that the images are of the same size.
Gradients are nice to add some vibrance to your edits, and Powerpoint lets you adjust the angle of the gradients for variation.
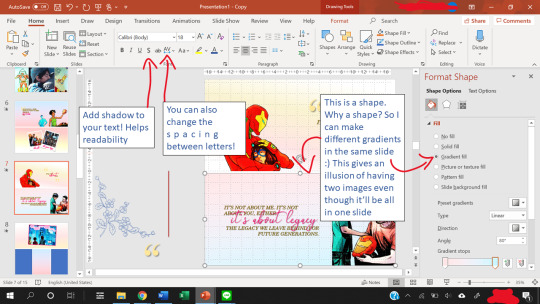
Other useful features include the text shadow effect and the spacing of letters.
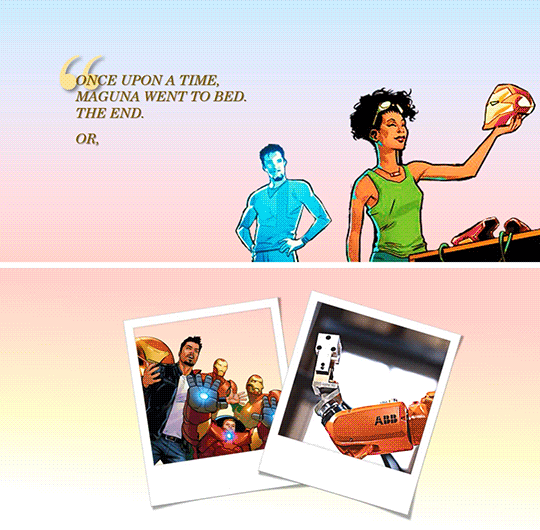
To see how you can use shapes as templates, let’s look at some of my edits.
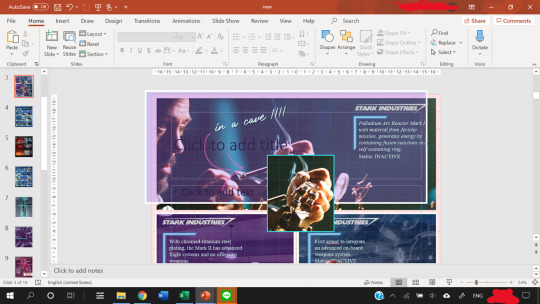
Anatomy of a Slide I
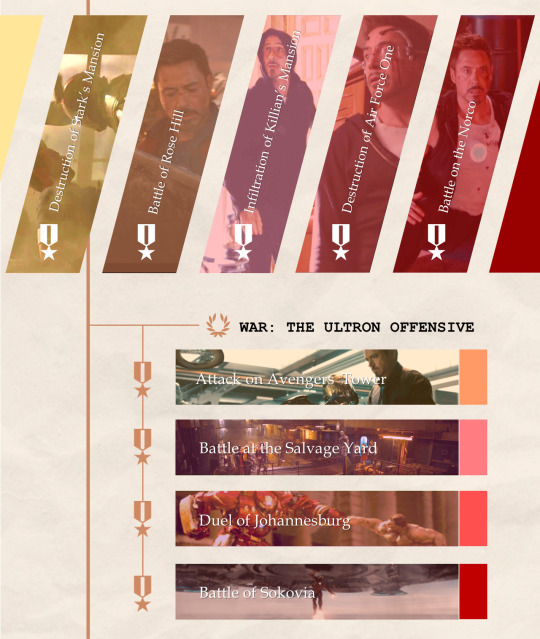
Let’s break this graphic edit down from my Tony Stark + Combat History edit. It has 12 parallelograms, 12 rectangles, 10 icons, 10 textboxes, 3 lines, and a texture background.
This is what the slide looks like as I put the first picture in.
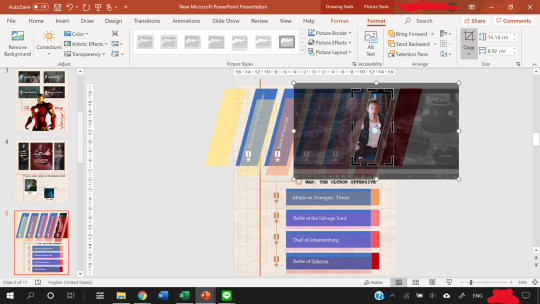
In the end result, the slide consists of:
5 parallelograms filled with a picture.
2 parallelograms at the sides are just filled with color.
5 more parallelograms are arranged on top of the 5 earlier parallelograms, and filled with a color. The transparency of the shape is adjusted so that it creates a sort of color filter for the pictures.
4 of the rectangles are filled with a picture.
4 rectangles are put on top of them, filled with color, transparency adjusted to again create a color filter.
Then, the 4 smaller rectangles at the end of the large rectangles are just filled with color. They are there simply for aesthetics :)
The 10 icons are the medals and the wreath. To find icons in Powerpoint, you can go to Insert -> Icons. Icons is right next to Shapes for me. You can change the color and transparency of Icons too!
The three lines are just to make everything look a tiny bit more cohesive and linked.
The texture background is a paper texture. To find texture backgrounds, there’s this really amazing resource post!
After the slide is done, you can save your slide as a PNG image (save as PNG and not as JPEG because JPEG is lossy and tumblr destroys it) by going to Save As -> PNG. You can choose to save one slide only or all the slides.
That’s it. You’re done making a graphic edit :)
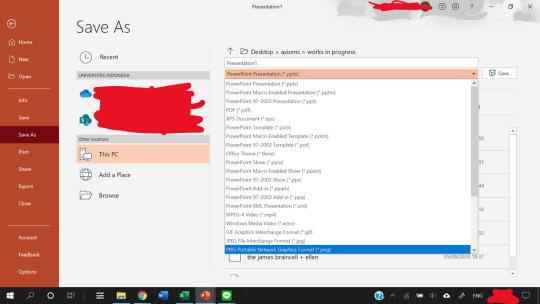
Notice that one of the save options is save as a GIF. That does not work unless you have the newest version of Powerpoint. I don’t have it, so in order to create GIFs, we need to find a workaround, which I explain next.
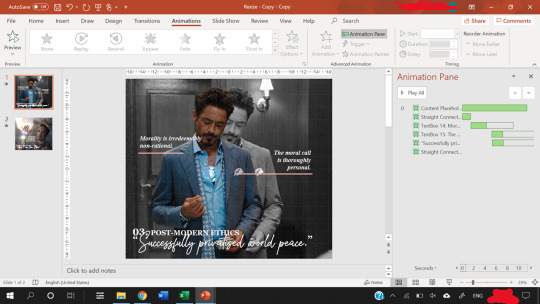
Anatomy of a Slide II
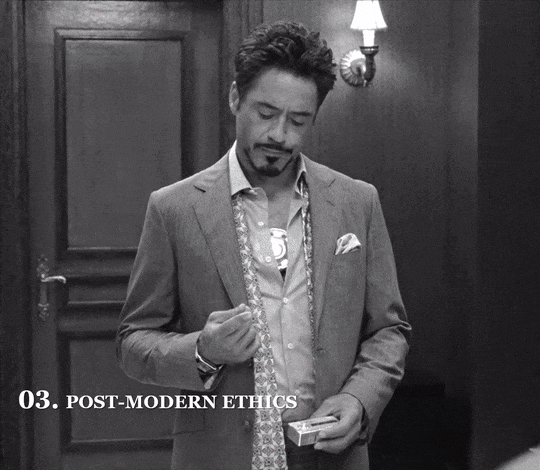
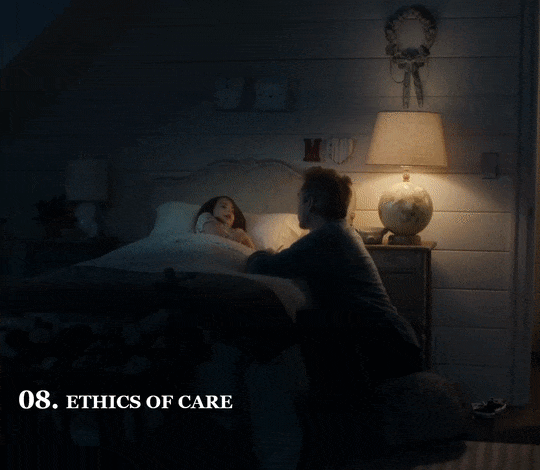
This GIF from my Tony + Ethics edit has 8 components/objects in it.
A black and white picture (a screenshot of Tony, cropped in Powerpoint and also turned black and white by adjusting the Color and Saturation in Powerpoint)
The color cutout of Tony.
Two lines (called Straight Connectors in the animation pane)
Four textboxes.
In order to make them appear one by one, animations are used. Here, all of them are animated using the Fade animation.
When you animate, make sure that the first object on the animation pane starts With Previous.
In the picture above, you can see that beside the first object in my Animation pane (the object called Content Placeholder) there’s a number 0. That means the animation starts With Previous.
Never set an animation to start On Click because then the animation won’t show up when you convert the Powerpoint to a video.
You can start an animation After Previous as long as the first animation is starts With Previous. Just never use On Click
To figure out what I mean by On Click, With Previous, and After Previous, you can check this link.
The objects with animations are the color cutout, the two lines, and three textboxes.
The color cutout is actually part of the original screenshot of Tony. I copied the screenshot, changed the saturation and brightness of it, and then removed the background using the Background Removal tool in Powerpoint.
For how to use the Background Removal tool, check this link.
Then, the color cutout is arranged to be in front of the black and white picture, and a Fade animation is put in place so that it looks as if only Tony is coming into color.
Similar animations are used for the textboxes and the straight lines. In order to animate by letter, follow this tutorial.
P.S. you can use emphasis animations to animate the color of a text.
Adjust the animation pane for the timing of the appearances, and present the slide to see if you’re satisfied with the final result.
The next step is how to convert the animated slide into an actual gif.
First, go again to Save As, but this time choose MPEG-4 Video (*.mp4).
Then, you extract each frame of the resulting video and then use photoshop to turn the frames into a GIF.
For a tutorial on how to make gifs in photoshop, check out this really amazing and blessed tutorial by @robertdowneys
Anatomy of a Slide III
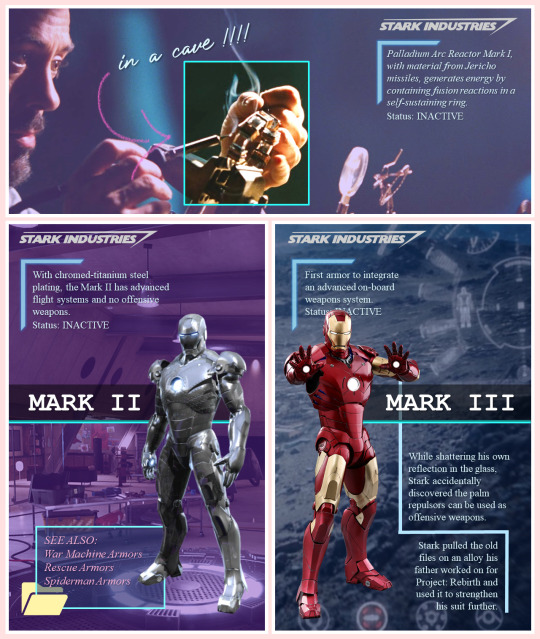
The top part of this slide has 8 components/objects to it:
3 rectangles
1 hooked shape
2 textboxes
The Stark Industries logo
The arrow
The hooked shape has a small glow effect added to the shape. Here’s a tutorial on shape effects. On that note, you can also make transparent text using various shape functions, and a tutorial for that is here.
The logo is a transparent logo downloaded from the internet, and the arrow is hand-drawn by me using the Draw tool in Powerpoint.
2 of the rectangles are filled in with the same picture and stacked on top of each other.
Then, the top rectangle is cropped to only Tony’s hand, and a border is added.
After that, another rectangle is arranged between the top and bottom rectangles. This third rectangle is filled in with a purplish color and transparency adjusted.
That creates a “highlight��� effect for the part of the picture where Tony is working on the arc reactor. This same trick is what I used to make several parts of my ethics edits, like this GIF which I like.
Except, this time I make a circle shape first, fill that circle with the same image as the background, and adjust the size of the image to be the same as the background using the Crop tool on the circle.
Then, I make the background darker and the circle brighter using the Corrections tool. This increases the contrast between the two to create a highlighting effect.
Add a border to the circle, and add a Fade in animation.
Save the Powerpoint as a video, and turn video into GIF in photoshop.
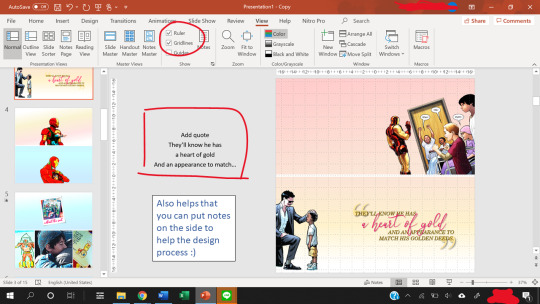
Anatomy of a Slide IV - Inserting GIFs
Finally, you can put gifs into a slide! This GIF is from my Tony + his heart of gold edit. Make the GIF in photoshop, then just copy and paste the GIF into the slide like any other picture.
You can rotate, crop and adjust the size of a GIF in powerpoint.
You can’t make any other adjustments (e.g. you cannot change the brightness of a GIFor the color. If you try to do that, the GIF will freeze and become a still image.)
The GIF will not play unless you present the slide.
Don’t steal GIFs :) Again go back to that blessed tutorial on how to make your own GIFs, or ask permission from GIF creators.
As you can see from the selection pane, this slide has 12 components.
The quotation mark is in a textbox of its own
3 textboxes with pink text (animated using a Fade in animation by letter), and 1 with the all caps text
2 polaroid frames arranged on top of a comic book panel (with background removed) and a GIF of Harley.
Plus, a comic book panel of Riri with background removed
Then there are two rectangles filled with a gradient color to serve as the “background” of the slide.
I made the bottom background rectangle a gradient that fades into white to make a more seamless transition to the next image.
You can see the GIF of Harley does not move in this view. However, when you present the slide, it will move. To check if you accidentally froze the GIF while editing, present the slide.
When you are satisfied with how the slide looks, again save it as an MPEG-4 Video (*.mp4). Then, you extract each frame of the resulting video and then use photoshop to turn the frames into a GIF.
That’s it!
Powerpoint has all those tools, and you shouldn’t be afraid to experiment :)
My foray into making edits was literally me, bored in class, with a presentation about data when I went... hey... that’d be nice if I put Tony’s face in it because isn’t everything better with Tony in it?
There’re even more useful features in Powerpoint but this tutorial’s gotten really long already, so I’ll leave it at that. Hope it helped!
You can send me another ask or message me if you’re confused :)
#asks#vormirjumper#resources#tutorials#i know you make beaufitul gifs but i included the gif tutorials in case achalk needs them!#this got WAY longer than expected#but i hope it's useful#forgive my ramblings#and i hope to see more of your edits because all that coloring!#and those captions of yours?? iconic
30 notes
·
View notes
Photo

so i thought it’d be a good idea to make a full indepth tutorial on how i make my gifs and what i do to achieve them! please be aware that everyone’s giffing style is different and this is just how i make them and what my settings are! you can do absolutely whatever you wish when you’re making your gifs!
i will be going over where you can get videos, how you can download them, how to use photoshop, vapoursynth, and colouring (regular gifs, performance gifs and selective colouring to change colours in gifs)!
step one: downloading the video
so i always try to get 1080p videos and if not 720p for the highest quality possible (there is the option of 4k as well but that’s not used so often)
TS files: kpopexciting, kpop24hours (you need a login for this), HDhallyu (for more older performances circa 2015 and before), dongyoungsang (for kdramas/tv shows)
Youtube videos: 4K Video Downloader
Vlive videos: Soshistagram
Twitter videos: Twitter Video Downloader
Instagram videos: Dredown
step two: using vapoursynth
so vapoursynth is similar to avisynth but it works much faster and has more options when it comes to sharpening and denoising gifs especially performance gifs! i’ll go over the steps i do to use vapoursynth but i have also provided a video i’ve recorded (it’s very basic) in case text is a little too confusing! there’s also this tutorial that goes into details on how the options work and how you can use them!
have two windows open, one containing the videos you’re using and the other with vapoursynth.
drag whatever video you want to use onto ‘vapourscript.bat’ and a terminal window will popup. this is where you put in the the timestamp of where you want to start and end your clip in the HH:MM:SS format.
enter your starting point first and then it will prompt you again asking for the duration of how long you want the clip to be.
hit enter again and wait until the resizer.html pops up and from here you’ll put the settings you want to use for your gifs.
gif size
gif widths (the first number) recommended for Tumblr:
1 gif per row: 540px
2 gifs per row: 268px
3 gifs per row: 177/178px
opacity
changes how you view the video in the window.
preprocessor
refers to how the video will render! it refers to the number of frames per second (30 frames or 60 frames). i don’t normally use this cause it slows down the application for me personally but you can use it to your liking1
denoise
helps remove noise from gifs. I use KNLM and you can toggle the settings how you see fit
extra sharpening
it’s pretty self-explanatory but you just basically go off of your preference!!
then you just copy and paste your what you see on that white box in the browser onto the application and trim it to the length or number of frames you need! once your done you go to script > encode video and make sure to change the ‘no header’ to ‘y4m’!
step three: using photoshop
to create gifs in Photoshop, go to File > Import > Video Frames to Layers and then select your video file/output file from Vapoursynth. depending on how long your clip is you can press ok or select the option “limit to every 2 frames”.
with photoshop you can adjust the timing of your gif even further! my usual preferences are:
<20 frames: 0.15
20-59 frames: 0.1
60+ frames: 0.07
you gif should be under 3mb - to decrease a gif’s size, i usually delete frames and/or use selective color to increase the black percentage for whites, neutrals, and blacks.
with tumblr saying you can go over 3mb for gifs you definitely can but it will lower the quality of the gif. if i need to i’ll go up to 4mb at most.
step four: sharpening
it’s completely optional to do this since vapoursynth does some sharpening for you and you can find a ton from @completeresources and @yeahps to just name a couple ps resource blogs!!
you have to change the timeline from frame animation to video timeline and you can do that by clicking the button on the bottom left corner on the timeline that looks like stacked rectangles.
from here you will have to make all your frames into one layer so you have to go to filter > convert for smart filters. and you can use your action on that by going to the actions panel, selecting what action you want to use and press the play button.
now you can put the colouring that you would like on your gif!
step five: saving
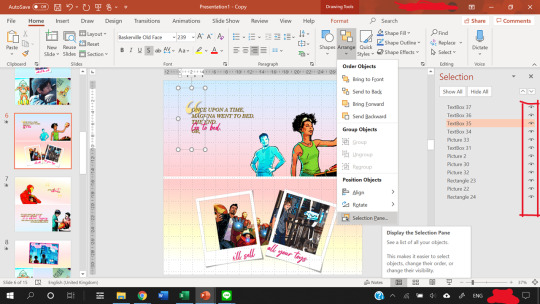
now when you save you can do the shortcut ctrl+alt+shift+s or go to file > export > save for web and these are my setting for when i save:
miscellaneous notes
here i have three different gifs of the same scene to just show the difference between using .mp4, .ts only, and .ts + VS. as you can see there’s a significant difference between each of them especially the .mp4 versus .ts + VS.

how i colour
the adjustments i currently use the most are:
curves
brightness/contrast
color lookup
levels
selective color
some things that i personally like when i’m colouring is:
having the black of the gif to the darkest it can be
vibrant
to get the black areas to the darkest it can be, there are two options. option one is i would use a mix of curves and levels. i would start off with the curves and use the eye dropper tool that is filled with black and click on that then i would click on the darkest spot of the gif then it’ll automatically recolour the gif so the area that you selected would be black.
to keep the skin tone of idols intact i usually do the following:
keep the vibrance high
use selective colour to colour correct the skin
give a warmer tone to the gif using color balance
here’s just an example of how colouring can make a difference in the gifs and how they look afterwards as well:

most of the time i have around 3-5 adjustments for gifs if i need to but you definitely can add more to your desire!
how to change colours on gifs
changing colours completely is honestly a lot and sometimes it can take up to 10+ adjustment layers if you need to. it takes a lot of practice but the more you do the better you’ll be at it! i’ll basically be explaining how i went from this:

to this:

so tips for this type of colouring:
its easier on gifs that have mostly white backgrounds
it’s easier to change from cool tones to warm tones rather than the other way; especially if there are people in the gif. trying to change warm tones will affect the person’s skin colour
the main adjustments that i use to achieve this colouring is:
hue/saturation
colour balance
colour selective
so i’m going to be changing the blues of this gif into red/pink!
so you use the hue/saturation tool and click the drop-down with master and go to really any option cause you need the eye dropper to be activated.

i’ll use the eye dropper tool to select the cyans/blues in the gif and from there it’ll only change that colour to pretty much any colour you want. it doesn’t always allow you to have smooth changing of colours like this gif so sometimes you may need to use multiple hue/saturation layers to fix it! sometimes using colour balance also helps as well but it’s more broad in that it will change everything that is within the shade range of the colour you’ve selected.
for mostly white backgrounds what’s easiest is that you create a new layer and fill that layer with the colour you wish and change the layer from normal to multiply.
before:

after:
352 notes
·
View notes
Note
How do you make GIF's?
Magic
No but seriously, let me show you my process! We’re gonna make this gif.
A detailed look at my gifmaking process below the read more. It’s long. And a lot.
So I use a combination of KMPlayer and Photoshop CC to make gifs. The longest part of my gifmaking process for me is creating the screencaps I use to make the gif.
So first I have to find and download the right episode in a decent quality (something not too grainy or pixelated). Then using KMPlayer I make screencaps of the scenes i want to gif. The process looks like this:
So open the video you want to gif. Find the scene you want screencaps of. Hit pause. Then hit control G on your keyboard which will open up this

These are my settings. Feel to change them how you want. I find this works best for me. So pick where you want the screencaps to end up (extract to) and what you want the screencaps called (i usually just put the episode number and a key word) and when you’re ready hit the start button. This will start taking screencaps. So go ahead and unpause your video. Wait until the scene you want capped is done then hit pause again. Hit control G to pull the window back up and hit stop.
You now have your screen caps! Onto photoshop!
To make a gif you’re gonna start by loading your frames which you can do by doing going under File –> Scripts –> Load files into stack

which will open this

Hit Browse and select all the frames you want in your gif. When they’re all loaded up hit okay and proceed to wait while Photoshop loads them. I try to stick to no more than 30 or 40 frames per gif otherwise the gif gets too big and tumblr hates it
Once the frames are loaded hit create frame animation

Then you need to make frames from layers and then reverse the frames cause now its backwards


And now I pick my gif speed. Select all your frames

And change the speed. My go to is .1 seconds

From here its about sizing, cropping, and coloring. This process is different with every gif I make. Here’s how to size:

I like big sized gifs so I resize it down to about 500 piles

Okay now I convert it from frames to a timeline so make sure all of your frames are highlighted, then click the little button underneath the first frame

Once that’s done select all layers
And convert to to smart filters

At this point I make sure that I’m at the beginning of the gif so when I add new adjustment layers its at the beginning.
All my adjustments are done using the tab on the right side of my screen So i’m gonna go mess with those and show what i t looks like at the end of the process
Now I mess with the brightness and curves especially for this gif because it’s so dark.

a little contrast and a little vibrance fix the colors up a bit

Now i need to sharpen it and stuff. Make sure you on your base layer for this and not an adjustment level. This is done under filters –> sharpen

I also add a layer of surface blur to smooth things out


Once you’re happy with how things look go under file –> save for web

Make sure it’s looping forever

Check the size and make sure it’s not over the tumblr limit which i think is like 5mb now? I keep it around 3mb to be safe.

Play it to make sure you like how it looks

and go ahead and save it!
You’ve now go a gif
#theladyoffangorn#making gifs#gifmaking#my process#mod post#ask#mod replies#tutorials#gif tutorial#tutorial
116 notes
·
View notes